Odin Validators can be registered using two different attributes.
All validators need to be registered using one of these attributes, except for ISelfValidator. The main difference between them is that RegisterValidationRule will make it so that the validator is serialized and listed inside the Validator's rules tab. In there you can enable / disable the validation rule or configure it using the validator's exposed members.
When it comes to deciding how to register the validator, ask yourself
If both of the question are true, then you will probably want to use the RegisterValidationRule attribute instead of the RegisterValidator attribute.
Let's take a look at a quick example of a validation rule implementation and see how it may be used to configure our validators.
First we will create the basic boilerplate code.
using Sirenix.OdinInspector.Editor.Validation;

[assembly: RegisterValidationRule(typeof(EmptyStringValidator))]

public class EmptyStringValidator : ValueValidator<string>
{
    protected override void Validate(ValidationResult result)
    {
        // [...]
    }
}
Note that we are now registering the validator using RegisterValidationRule.
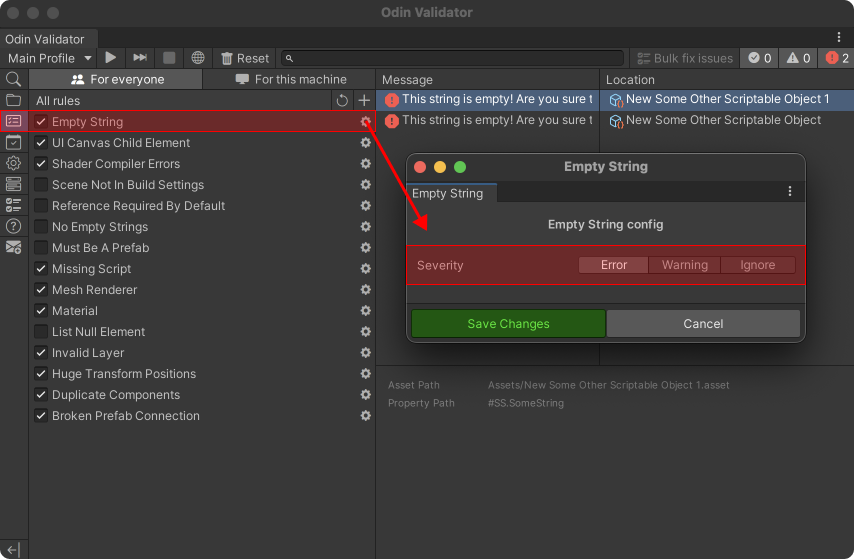
How we implement our validator stays the same no matter how we register it, but since this is a rule we can expose its members to the inspector and use them to configure the validator.
Let's add a ValidatorSeverity parameter to our class which will allow us to change the result type based on the severity chosen.
using Sirenix.OdinInspector.Editor.Validation;

[assembly: RegisterValidationRule(typeof(EmptyStringValidator))]

public class EmptyStringValidator : ValueValidator<string>
{
    [EnumToggleButtons]
    public ValidatorSeverity Severity;

    protected override void Validate(ValidationResult result)
    {
        if (string.IsNullOrEmpty(this.Value))
        {
            result.Add(Severity, "This string is empty! Are you sure that's correct?");
        }
    }
}
Now open the rules tab and locate your rule. You will see a toggle to enable / disable it, and a cog button, that will open the configuration window for this rule.
