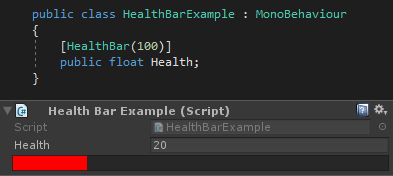
The goal of this guide is to create a simple HealthBarAttribute that can be applied to float fields or properties and a drawer that will draw a red health bar underneath the normal float field.
The first thing we need is the attribute itself. Create a new class, name it HealthBarAttribute and inherit from the Attribute class. We'll add a single public max health field, and a constructor to make the attribute easy to use.
public class HealthBarAttribute : Attribute
{
    public float MaxHealth;

    public HealthBarAttribute(float maxHealth)
    {
        this.MaxHealth = maxHealth;
    }
}
Now on to creating the actual drawer. Create a new script file and name it HealthBarAttributeDrawer. You should make sure that this file is only included in the editor by, for example, placing it underneath an Editor folder. That will prevent compiler errors when you are building your project later.
Let's define the drawer. Make a class in the file named HealthBarAttributeDrawer and inherit from the OdinAttributeDrawer<TAttribute> class.
You will find that there are two versions of the OdinAttributeDrawer class. One with a single generic argument, and one with two. The first argument in both versions is the Attribute type to make a drawer for. In our case that will be the HealthBarAttribute class, we made earlier. The second argument in the second version is a way to constrain the value types that this attribute drawer can handle. This will also create a strongly typed drawer, and let us easily access the value of the property the drawer is asked to draw. Since we want to draw a health bar based on the value of a float then we will add float as the second generic constraint in this case, making sure that this attribute drawer only applies when [HealthBar] is put on a float value.
public class HealthBarAttributeDrawer : OdinAttributeDrawer<HealthBarAttribute, float>
At this point, it is worth to point out that this means our drawer will only work on float types. If you want to make the drawer work for every single primitive type, int, double, etc, then you have to make a copy of the drawer each with a unique value constraint for each of primitive types you want support. A single drawer can also constrain itself to several types at once using generic constraints; find out more about this here.
Moving on, we need to override the DrawPropertyLayout method. This is the main method needed for implementing custom drawers.
protected override void DrawPropertyLayout(GUIContent label)
{

}
The first thing we want is to draw the normal float field for the property. We could manually call something like
// In this case, we don't need the label for anything, so we will just pass it to the next drawer.
this.CallNextDrawer(label);
And finally, we can draw our health bar. I won't go into the specifics of how this works for this guide. You can find a more in-depth guide on the IMGUI system here:
This should be the final implementation of the DrawPropertyLayout method.
protected override void DrawPropertyLayout(GUIContent label)
{
    // Call the next drawer, which will draw the float field.
    this.CallNextDrawer(label);

    // Get a rect to draw the health-bar on.
    Rect rect = EditorGUILayout.GetControlRect();

    // Draw the health bar using the rect.
    float width = Mathf.Clamp01(this.ValueEntry.SmartValue / this.Attribute.MaxHealth);
    SirenixEditorGUI.DrawSolidRect(rect, new Color(0f, 0f, 0f, 0.3f), false);
    SirenixEditorGUI.DrawSolidRect(rect.SetWidth(rect.width * width), Color.red, false);
    SirenixEditorGUI.DrawBorders(rect, 1);
}
And that's all there is to it! You could expand upon this example by adding controls to the health bar, for example, the ability to change the value by clicking upon the health bar. You could also decorate the health bar by drawing a plus Editor Icon in front of the bar. Or entirely convert the health bar to draw a set quantity of lives instead of a bar.
Attribute:
using System;

public class HealthBarAttribute : Attribute
{
    public float MaxHealth;

    public HealthBarAttribute(float maxHealth)
    {
        this.MaxHealth = maxHealth;
    }
}
Drawer:
using Sirenix.OdinInspector.Editor;
using Sirenix.Utilities;
using Sirenix.Utilities.Editor;
using UnityEngine;
using UnityEditor;

public class HealthBarAttributeDrawer : OdinAttributeDrawer<HealthBarAttribute, float>
{
	protected override void DrawPropertyLayout(GUIContent label)
	{
		// Call the next drawer, which will draw the float field.
		this.CallNextDrawer(label);

		// Get a rect to draw the health-bar on.
		Rect rect = EditorGUILayout.GetControlRect();

		// Draw the health bar using the rect.
		float width = Mathf.Clamp01(this.ValueEntry.SmartValue / this.Attribute.MaxHealth);
		SirenixEditorGUI.DrawSolidRect(rect, new Color(0f, 0f, 0f, 0.3f), false);
		SirenixEditorGUI.DrawSolidRect(rect.SetWidth(rect.width * width), Color.red, false);
		SirenixEditorGUI.DrawBorders(rect, 1);
	}
}